
Well… I love my Apple Mighty Mouse, and have done for 6 months.
But, all of a sudden, I lost the ability to use the scroll ball to scroll upwards.
I trawled the web to find a solution, and although there are some useful answers, none of them sorted it.
I fear it fell victim to that horrible grey muddy stuff—you know, that horrible mix of hand oils and dirt which used to be the mouser’s bane in clogging up old mechanical mice.
I tried air dusters, I tried alcohol. Nothing fixed it. So, with trepidation, I decided to go ‘inside’ and clean it properly!
Just cleaning the ball from the outside isn’t any help at all, you’ll see why when you get inside… look at the pics below! You can’t de-gunk the rollers externally.
And here, I’ve recorded my efforts so you too can clean your mouse and get it functioning like new again!
First, you’ll need:
1. A small screwdriver, crosshead
2. A flat blade, like a butter knife
3. A large work area, with a sheet of white paper to catch the bits!
4. Some alcohol and a lint-free cloth
5. Some superglue (the best quality gel stuff is advisable!)
6. 10 minutes of total dedication, no disturbances!
7. A Sharpie marker or other fine tip permanent pen
8. Cotton wool buds/Qtips
First things first, unplug your mouse and print out this page. It’s far easier to work from the page if it’s printed cos you won’t be able to scroll without a mouse 😉
I’ve broken the whole process down with illustrations…
STEP ONE
You need to open the mouse. Don’t panic, it is pretty easy. You DO have to break the glued seal, but it’s non-destructive and mine looks like it did from the factory now it’s back together.
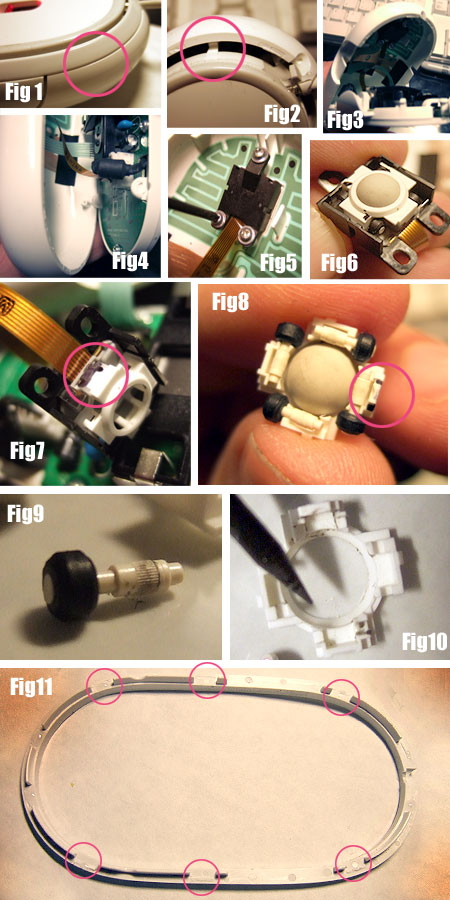
In Fig 1, I’ve circled the start point. It’s near the cable end, and you need to be prising the ‘skirt’ off. Insert the blade here and you’ll hear a crack! Work the blade gently all around. The skirt should come off now. Put it safely to one side.
STEP TWO
Near the cable end are two ‘tabs’ which hold the outer shell to the base. I found that by gently flexing the tab inwards towards the innards of the mouse, I was able to free them easily. (tab shown if Fig 2). The outer shell is now released at one end and pivots on two lugs at the opposite end (fig 3) and these lugs can be easily released by gently flexing the outer shell open at the pivot points. The two halves now come apart and are held only by two VERY delicate ribbon cables (fig 4). I didn’t find it necessary to remove the ribbon cables, as in past experience it’s tricky to put them back!
STEP THREE
Inside, you’ll see the little black housing which holds the ball, secured by three small screws. Undo them, and put them safe. (fig 5).
In Fig 6, you can see the ball housing. I marked with little black dots the orientaton of the little magnetic rollers inside. This will help when putting it back together. Also, mark the white plastic retainer AND the black housing together (fig 7) so you know which way to put them back together!
STEP FOUR
Carefully remove the white retainer by lifting the end shown in Fig 7, nearst the ribbon cable. The white retainer comes free. With it should come the ball and four little white pins with black collars—these are the magnetic rollers which feed the data to the mouse as to which direction is being scrolled. They are also the dirty bits! (fig 8).
STEP FIVE
Dismantle the little unit, remembering the orientation of the little rollers (the diagram should help!). Fig 9 shows a really dirty roller! Now clean the ball using alcohol and the lint rag.
Carefully clean the little rollers with cotton buds.
STEP SIX
Once the ball and rollers are nice and clean I blew all crud out of the inside of the mouse with an air duster (a compressed air tin) and used a small pointed tool to take all the muck out of the white retainer (fig 10).
STEP SEVEN
Re-assembly is fiddly… first put the ball back in the retainer.Hold the retainer as in Fig 8 and re-insert the rollers. You can’t put the assembly down flat from now on, as it will fall apart. See in the photo fig 8 that the black marked part of the white retainer (you did mark it with a pen, didn’t you??? ;)) is facing outward. (i’ve circled it on the picture).
Next, keeping the white retainer assembly upright, bring over the black part and offer it down over the white retainer assembly, with the black mark you made nearest the ribbon cable.
The whole thing goes together with a simple click of pressure. Turn it over and make sure it all looks OK, and that all the little black wheels are the same orientation as Fig 6.
Being careful to make sure the ribbon cable isn’t twisted, screw the ball assembly back into the upper shell.
STEP EIGHT
Keeping an eye on the ribbon cables, bring the outer and lower shell back together, starting with the pivot lugs. They snap back in really easily.
Once they are in, click the upper tabs back in, making sure the USB cable retainer is oriented back in it’s hole.
STEP NINE
Nearly there… place the mouse facing upward and get the skirt ready by placing it face down (with the little tabs facing up) in a clear area.
You now need to dab VERY SMALL dots of superglue on it. I’ve circled the dots I did in Fig 11… they are basically in the same place as the original glue.
Bring the mouse body over and lower it onto the skirt, making sure the USB cable is at the right end.
Press down a few seconds and let the glue take, then lift it all up and rubber band it tightly and leave for a while.
VOILA! It’s done!
Hope it works for you…
(*** DISCLAIMER: I did this quite competently with simple tools. If you break it, then that’s your fault, not mine!***)
I broke my mouse and it’s all your fault!!!! gahhhhh!!!
Just kidding. I just wanted to thank you for being this first to put their mouse under the knife. I knew there was glue SOMEWHERE but wasn’t about to start prying and breaking off tabs willy nilly. Your instructions, along with the promise of replacing anyones mice if they break it while following your instructions, eliminated any fears I had. So out came the tools, on went the Pantera, and lo and behold….
My extremely overpriced luverly MM is now scrolling down for the first time 5 months!!!
Thanks!
Thanks a lot! My Wireless Mighty Mouse has been acting up ever other week for the last 10 months. Cleaning it with a lint free cloth and alcohol only got it working again for so long and was getting less and less effective.
For anyone wondering, this guide also works with a wireless mighty mouse! I followed the steps word for word and experienced nothing different at all (except there is no USB cord to worry about 😉 )
You gave me courage. I’m a sculptor and pridefully boast I can fix anything. But of course when it comes to little tiny plastic electronic parts I have to admit I wimp out……. I love the scroll feature on my wireless mouse and have been lamenting it’s non-function for a couple of months.
Knowing just where to break into the skirt gave me the courage I needed. I followed your careful instructions and all went well. except the tweezers I used to put back the little rollers made placing the magnetic rollers back into their home spot caused a bit of a second look. I abandoned them in favor of a nice sharp wooden toothpick to arrange them in their saddles.
Thanks for helping me out!
Thanks!! This helped me a lot. There are some other opening the mighty mouse tutorials. However break the inner skirt to open it. I think that this works much better.
__________
Daan en Paul
Thanks a lot! My mouse was working in a very erratic way. Thanks to you works again!.
I just want to point a couple of hints for others:
You can use a common set of clock screwdrivers to open the mouse. (actually, you’ll need’em to remove the tracking ball housing anyway). Use the smallest one to pull off the mouse’s bottom.
For figure 8, if you forgot to mark the white retainer, just note only three sides of it have the same size. The fourth one is larger. The largest side must be placed facing the ribbon. There’s no other way to make it fit in place. If you keep this in mind, it’s a lot easier to place the rollers again in their slots directly inside the black housing and then simply push the white holder over.
The only part I’m afraid of is, since the mouse is glued, every time you want to clean it, you gotta slice through the glue to separate the bottom ring, clean, glue again and wait until next time needs to be cleaned again… How many times you have to glue back this thing? Apple should think about it.
Thanks a lot! my mouse became a little non-responsive. Now thanks to you everythink it’s ok again!
I was just to point a couple of hints for others:
It’s easier to open the mouse if you use a set of tiny clock screwdrivers. (you’ll need’em to unscrew the rollerball housing, anyway). Use the smallest one to push the tabs on figure 2.
When you are ready to put everything back in place, if you forget to mark the white retainer piece (figure 8), just note the retainer’s sides ain’t equal. The one which must face the connector ribbon it’s the only one larger. If you keep this in mind, you don’t need to place all 4 rollers and ball in the white retainer. You can do it directly in the black housing piece. It’s easier ’cause the black piece has lager sides and you have more control when assembling the unit. The rollers are magnetic. In the white retainer they have the nasty tendency to stick with each other. In the black one, you have more room to distribute them.
And finally, when you glue back the external ring, keep in mind you’ll need to open again the mouse next time it’s dirty. Keep the glue at a minimum.
Thanks alot my mouse works just fine now you saved me $50 bucks. Just a thought for those trying to put the magnetic rollers back in. I used my very small screw driver to attract the magnetic roller and then put the roller in its clockwise pointed place HELD IT DOWN WITH A Q-TIP while removing the screwdriver.
I used to clean mighty mouse: Upside down mouse, put little water on your finger tip, rub scroll button gently with wet finger, scroll button in all directions, repeat this action, after rub, scroll the ball throw yellow stick paper or any kind of water absorbing paper.
Thank you for the detailed step by step process. The pictures were most helpful. My mouse scroll ball works great now. Thank You – You are a blessing.
I broke mine totally….
I lost the scroll up functions about 3 weeks ago
I did everything perfectly following the guide…
now the mouse ball lost all functions… it just WON’T scroll anywhere….
any ideas? any suggestions? I will try everything before I buy a new one…
Thanks so much! I works perfectly now. I took me longer than 10 minutes though. (just getting the magnetic rollers in place) but i think it would be easier the next time. Two hints I borrowed from my own work… when gluing the skirt back on, get the skirt in place and put the super glue on the corner of a business card and insert the glue into the seam. These prevents large drops of glue on the outer case. Also, the super glue I use (from Lee Valley) has a super glue solvent. I will use that when I need to take it apart the next time to prevent having to keep “breaking” that ring. I dont know if the solvent works on different glues, or just theirs.
Thanks so much! I works perfectly now. I took me longer than 10 minutes though. (just getting the magnetic rollers in place) but i think it would be easier the next time. Two hints I borrowed from my own work… when gluing the skirt back on, get the skirt in place and put the super glue on the corner of a business card and insert the glue into the seam. These prevents large drops of glue on the outer case. Also, the super glue I use (from Lee Valley) has a super glue solvent. I will use that when I need to take it apart the next time to prevent having to keep “breaking” that ring. I dont know if the solvent works on different glues, or just theirs.
OMG! i followed the steps and my mighty mouse is revived! THANK YOU SO MUCH! this was my 2nd mouse though and i thought how crap the mouse was with the scrolling wheel being spoilt everytime. now its as good as new, a very responsive mouse indeed!
i was afraid when prying open the mouse skirting cause really it sounded it was gonna break anytime man. hahahhah! but after that, it all went gooooood! ((: thanks a mil!
I bust mine too after following all steps precisely, not too worried though, it pissed me off only being able to scroll some directions. At least the mac works haha cheers
so i took mine apart again and it seems that if total loss of function happens, it is because the rollers are inserted the wrong way around. just flipped em over stuck it back together and now it works better than ever b4
Hurrah! It worked as advertised and I now have 2 working Mighty Mice (I had bought a new one before my wife found the instructions). Thank you for a clear and concise set of instructions. As some of the previous correspondents, I found it easier to assemble the rollers in the black case and them drop the ball into the middle and refit the white retainer. Now I just have to wait for the black permanent ink which has mysteriously appeared on the ball to wear off…
Excellent instructions! Worked great for my mouse wheel.
Be sure that your fingers are entirely free of any superglue residue. Otherwise you’ll damage the shiny white surface.
I performed the operation and my mouse is now working fine. Had some issues with super glue. It stuck my fingers and marked the surface of the mouse, but didn’t stick the surround back. (Seems Super Glue is as ‘Super’ as the Mighty Mouse is ‘Mighty’). I learnt that “rubber band it tightly and leave for a while.” is an essential step.
It’s a well built product, but just flawed when used in the real world. The replacement must surely use a laptop style touch pad for a scrolling device.
Thanks a lot for your help.
What a superb tutorial,
Worked for me just fine.
Thanks a lot!
Adrian B
So many thanks, your tuto is really clear and i was able to clean effectively this mouse.
Greetz from France
Thanks! The steps you give were easy to follow & worked fine for me.
In Step 2 (Figure 4) you say not to remove the ribbon cable. For me it was easier to release the cable from it’s jack on the logic board. To do this you use that same little screwdriver you have earlier & gently pry up in the sides of the black tab in the jack. Once this is up the cable pulls out easily. That way I could play with the scroll ball assembly free from the rest of the mouse. Reassembly is the reverse. Put the cable in & push down the tab.
Thanks for the great instructions. Worked like a charm.
One more tip, when you take the ball housing apart, make sure you are close to the table. Mine “exploded” and luckily I was able to get all the rollers back into position and not scattered all over the floor.
Not wanting to crack open my mouse (I have a history of taking things apart and…well..you get the picture.) I tried Raj’s suggestion. My mouse is scrolling wonderfully with the characteristics small clics of the roller-ball. I have kept the ‘surgical procedure’ if, in future, something more invasive is needed.
Thanks for the help.
John Paul
Thanks a million. You just helped me put the ‘M’ back in Mighty Mouse! It’s now fully functioning again. Joy!
I was a bit cheesed with Apple for making this such an awkward operation; it used to be so easy to clean the original Apple mice. A Mighty Mouse is a great piece of kit but it’s obviously going to need periodic cleaning. I guess they figured most folks would just toss them away and buy a new one. Or maybe they figured we would be crazy/determined/smart enough to figure out how to clean it ourselves! 🙂
Before you do all this you may want to try what worked for me already a couple of times. My mighty mouse (wireless) is more than a year old. If the scroll ball loses its ability to scroll in any direction it is most likely due to dirt build up. Get a can of compressed air and blow right into the ball, if you get the right angle you will make the ball spin, this is good. Now flip the mouse upside down with the ball on the desk, better to use a clean printer paper on the desk. Slide the mouse in several directions to put the ball in rotation. Repeat the blowing-rolling process another time if necessary. Hope this helps.
Wonderful example of self-help guidance. My bluetooth Mighty Mouse is now working 100%, thanks to the cleaning guidance provided here. Saved me from buying a new one!
The detailed description looks really good and I’d tried wetting the finger with no luck before thinking about opening it up, to no avail. However I rememembered my old mum’s thing about the magic properties of vinegar for cleaning and other stuff. I gave that a last desperate try applied to upside down mouse with a couple of serviettes. It worked, at least for the time being.
Now I’ve left some vinegar in a saucepan to see if it cleans the metal. I once swallowed a foreign coin on a holiday in Spain (don’t ask) and a day later it came painfully out t’other end brand spanking clean and shiny from all the somach acids so perhaps that’s how vinegar works.
thanks man my mouse works perfectly now.
This is a fantastic set of instructions, the only thing is, despite using a tiny cross screwdriver, size 0.2, the 3 screws would not loosen at all. So i’ve got a new, wireless mouse (not apple). The challenge must not be left, however, so if you have any tips on loosening those 3 screws I will try again. Many thanks, this is a great site.
This is a fantastic set of instructions, the only thing is, despite using a tiny cross screwdriver, size 0.2, the 3 screws would not loosen at all. So i’ve got a new, wireless mouse (not apple). The challenge must not be left, however, so if you have any tips on loosening those 3 screws I will try again. Many thanks, this is a great site.
I’ve had this page bookmarked for a while now as it’s been unreliable since the day I bought it but never had to use it as some time upside down, abusing the ball followed by a few bangs would always fix it. Tonight my mouse stopped scrolling down and wouldn’t come back however hard I ‘cleaned’ it, hit it etc.
Before breaking out the knife and screwdriver I read the whole thread and tried raj’s wet finger solution. It worked… For now, in fact it seems to be working better than it has for a few months but something tells me i’ll be following the full instructions soon…
Plastic pry tools work great for this job . . . being nearsighted also helps too, lol. Thanks for a great guide on how to clean this little sucker. A tip for carlo ak would be: Don’t Break It!!!
Well, not everybody is a winner…
I had very little room to get the screwdriver in there and snap, one of the ribbons broke. Mighty Mouse RIP.
Now I need to decide to buy a new MM, wired or wireless. Very expensive… Or use an old Logitech Bluetooth Mouse for an old DiNovo.
Or buy a cheaper new MS Mouse or Logitech…
For now… who knows… And now browsing th Apple Store site has got me looking at a Bose or other docking station for cranking up my iPhone or MacBook Air volume at work…
Oh well… Que sera sera.
Thanks a lot for the clean guide. Now it goes fluently.
Leonardo’s compressed air and mouse inverted on clean paper technique worked like a treat! Thanks a lot!
Worked fine for my wireless mighty mouse too! Thanks for the pictures.
Raj’s solution works perfectly ! There is no need for a risky operation on your MM !
what about cleaning a regular MAC mouse, usb connected? (it just says Mouse on the bottom. Apple wants me to buy a new one, I don’t want too. (it’s MY money man!) thx
Thank so much, now mouse is scrolling perfectly.
there was so much crud build up, now going to make people wash there hands before using the Mac from now on.
You saved me from buying a new mouse
Cheers
Reuben
Just tried your suggestions and they worked like a charm! Did not have Super Glue Gel and will have to buy some. But the Mighty Mouse works fine without the retaining ring for now. The ring only makes the mouse look nice and keeps out gross dirt but is not needed to hold anything in. I was truly amazed at the gunk inside! I understand Apple’s passion for good design but I think they went a little too far this time! But now that I know how to keep my Mighty Mouse in good shape, I won’t have to buy another one! Thanks again!
First try Raj’s “wet finger trick”!!
I bought second mouse after the first one stopped working, then I’ve found this tutorial and fixed the first one which is now waiting in a drawer 🙂
Now second one stopped working and I’ve tried Raj’s trick and it worked! So, try this first:
“# raj Says:
July 6th, 2008 at 8:12 am
I used to clean mighty mouse: Upside down mouse, put little water on your finger tip, rub scroll button gently with wet finger, scroll button in all directions, repeat this action, after rub, scroll the ball throw yellow stick paper or any kind of water absorbing paper.”
At the end I have to say I’m really pissed at Apple for making a product they can’t fix without “breaking”. Stupid…
I began the disassembly of my mouse inadvertently by throwing it at a door. I figured I had my old mighty mouse on hand in case that didn’t fix my current one, but when I couldn’t find my last one, I had to try and fix the thrown one. Thankfully, it was already disassembled for me once it hit the door, and all I had to do was unscrew 3 screws, wipe the rollers down, and reassemble. Works great!
YES! My mouse scrolls up again! Thanks you so much for the great instructions! Although, the little rollers were a bit of a bother, it saved me from having to buy a new mouse. I’m trying to decide if I should glue the skirt back on or not. I’m thinking not. Saves me the trouble next time I have to clean it.
Thanks!
HI, The directions are perfect. I opened the mouse and cleaned. But when I closed it, and connected, it made a noise, and the ball doesnt work. The rest is perfect, but what can be the mistake? (the noise is a permanent bzzzz)
Thanks for publishing this guide. Ball only worked 3 ways out of 4, following your strip down info I found that one bad boy was caked up with crud.
Now have four way scrolling, ace.
Thanks again.
I guess I’m not surprised that Apple made servicing the one part of a laser mouse that requires user service a warranty voider. I really needed to get that hand smud out of my mouse to correct tracking problems and this tip worked perfectly. Thanks for the clear explanation.
thank you very much, this is my second mouse, the first i got on warranty and was looking to buy the next one
works like new
many thanks
kind regards darren
This was awesome. Thanks so much. Nothing else worked but this did. You are very generous to put your own time and effort into helping other people. Well done!
I wonder would little bits of Blu-Tac work instead of glue? Then it would be easier to dismantle again, and again. No?
Thanks. It worked.
Thanks!!! Opened up my wireless mighty mouse using your directions and now my mouse scrolls perfectly for the first time in months!
Worked like a charm. Fiddly reassembly is accurate, but it did go together and my mouse is mighty once more. Thanks very much.
Thank you so much!!! Now I know that i have the best mouse on earth!!!Pay attention to put rollers in the right direction(in opposite of iron leaf)(fig 6). I did it wrong for the fist time. But the second try…was perfect!!!
Great tutorial here! I started the process without a tutorial and then found myself getting a bit lost. This really helped finishing the job and getting it back together. In the process of taking apart I accidentally removed the scroll ball ribbon from the board, but was able to get that back in without much trouble. Also, I have a wireless Bluetooth Mighty Mouse, and your instructions work just the same on that mouse (minus the USB stuff). Anyway, thanks a lot.
Thanks, it worked like a charm.
At first the right click didn’t work, but after repairing everything worked like it should.
Plastic model glue is just perfect for this job.
Thanks again.
It works! the scroll on my wireless mighty mouse didn’t work anymore and tonight I tried this solution and now it works like new! Took me more than 10 minutes but it worked like a charm. thnx a lot man!
Followed instructions, now the ball don’t work at all. Any ideas?
Nice walk through. Solved my on going issue in about 8 minutes flat…
Thanks!!!
Really good info, and very well explained. As everyone else that wrote you a great review… I believe you are an amazing friend. Thanks for sharing this info with all of us.
My mouse works greta now.
Paula, I had the same problem.
Before you click it all back in to place, but with the ribbons attached inside, plug it in to your mac. If yours was like mine the buzzing started straight away. Hold the two shells apart and rotate them slowly and the buzzing should stop. Gently clip the back lugs in and then click the front lugs in to place. Hopefully you will now have a buzz free mouse. Reading up on it it is something to do with the copper shielding in the top of the mouse. Good luck.
Good Job
my mighty mouse is 3 years old, I used the alcohol trick several times but there is only so much it can do. The instructions works really good. If you have big hands like me it’s easier to put the magnetic rollers in the black part instead of the white, they will stick (magnetically) to the little metal sensors, this takes care also of the rollers orientation.
Ciao
Roby
I tried to clean my MM following the instructions above, but due to my hamfistedness I managed to break the white moulding that holds the ball in place. My solution…I bought a PC Line optical USB mouse ; plugged it in and away I went, and all for less than a fiver. OK I know I can’t scroll sideways, but I never found that very useful any way. Bur I can still lock on the page scrolling by holding down the scroll wheel.
thanks man it really works. greetings from mexico.
Nice instructions – I did mine – now scroll works fine – cannot move cursor – I think I got contact cleaner in the optical part – because all else is fine – Just a tip test mouse before glue back together – its a less optimistic approach but a sensible one – Anyway so it remains totally stripped – waiting for magic mouse to arrive 🙂
Worked great! Took me about 20 minutes and I did it right at my desk. I was so excited to find this tutorial. I’ve been looking and looking for a way to fix this problem myself instead of sending the mouse back to apple. Brilliant!
Well done, this also works for the bluetooth mouse A1197. My daughter has dropped it rather too many times and with a pair of AA batteries it is very heavy for the delicate components.
The most common cause of mouse failure following dropping is the metal tag on the battery cover gets bent too flat to push in the plastic switch lever. Simply bend it back out with a screwdriver and it should be fine. 🙂
Well done, this disassembly also works for the bluetooth mouse A1197. My daughter has dropped it enough times, and with a pair of AA batteries it’s very heavy for the delicate components.
The most common reason for the mouse not working seems to be that the metal tag on the inside of the battery cover gets bent too flat to operate the switch. Simply bend it back out far enough and all should be well. There is no reason to open the mouse to fix this – unless you are just curious!
Personally I recommend the Bluetake BT500 series – far smaller, much lighter… The latest one even has a usb recharge facility 🙂
Thanks, worked a treat, one tip though, do not refit the retaining ring when finished, it is unnecessary and you will only have to take the damn thing off when the wheel gets full of crud again…..
Many thanks for this tutorial – I knew there must be a way to do it, i just didn’t know how. It is surprisingly easy once you get past the glue.
Thank you, I can now scroll down again. I am not surprised it didn’t work, it was manky in there!
thanks. Worked a charm. Greetings from Cape Town.
I have also for now left off the retaining ring – means dirt might get in a bit quicker from below, but it is the skin oils and dirt that seem to be the problem.
Thanks for the tutorial easy to follow although i did disconnect the ribbon leads to the scroll wheel and upper case as it made life a lot easier when working on the scroll wheel assembly. The only hard part was to remove the ‘skirt’ it is very thin around the point where the cable enters the mouse at the front and because you have to apply so much force to remove it my ‘skirt’ broke at this point. Saying that i completed the cleaning process and reassembled it. I used masking tape to hold the skirt on while the super glue dried this held the skirt evenly all around the bottom. Thanks again.
Simple solution – Take a cotton bud and soak it in Whisky. Generously dab the bud onto the ball to soak, then quickly upturn the mouse & roll the ball in several directions over absorbent tissue. Instant success!
bloody brilliant!!! thank you very much for this extremely usefull article
thanks very much. But i did mess up the outer rim.
yes just more success, thanks for you help!!!! scrolling like a champion again.
Thanks! BIG one.Works like new.
Hey the mighty mouse we owned was giving some trouble since last year. We run audio video studios here in India. Due to the disfunction of the schrol ball we use to loose almost 2 hours of work daily. With the help of your useful step by step instruction we managed to fix our mouse. We would like to express our thankfullness towards you. Great help for the people with very little access for servicing such equipments.
Just one point, why bother replacing the glued on retaining ring, you are only making work for yourself once you have cleaned it, when the mouse is in use the absence of the ring is not noticeable…. and, does not affect the operation.
Thanks for the tutorial! Now my mouse scrolls again.
My mouse is working again. Yeah!! Many Thanks
I tried this after attempting the advice on Apple’s own site (which didn’t work).
I’m pleased to say the approach above worked where Apple’s suggestion didn’t!!
Thank you. Your instructions were perfect and now I can scroll again! Mind you, I’ve lost the use of the centre button, but I think this happened before I took the mouse apart. And I don’t really use dashboard all that much. I struggled reassembling the rollers until I hit on the idea of holding the assembly on a blob of Blutak!
Tried this below, but it does not stop buzzing and scrolls up and down, over and over. Tried unplugging cables and rotating them, tried overlapping them in different ways. Still buzzes and does not work. Stops when i unplug the trackball cable, though trackball is disengaged. Next?
(see below)
# Paula Says:
March 28th, 2009 at 10:09 pm
HI, The directions are perfect. I opened the mouse and cleaned. But when I closed it, and connected, it made a noise, and the ball doesnt work. The rest is perfect, but what can be the mistake? (the noise is a permanent bzzzz)
# Graham Says:
September 2nd, 2009 at 3:34 pm
Paula, I had the same problem.
Before you click it all back in to place, but with the ribbons attached inside, plug it in to your mac. If yours was like mine the buzzing started straight away. Hold the two shells apart and rotate them slowly and the buzzing should stop. Gently clip the back lugs in and then click the front lugs in to place. Hopefully you will now have a buzz free mouse. Reading up on it it is something to do with the copper shielding in the top of the mouse. Good luck.
Thanks so much! My scroll ball was completely unusable, and now works like new thanks to this guide!!!!!
Job done, thanks to your clear instructions.
my son gave me a wireless mighty mouse, I didn’t understand why he did as he uses himself a wired MM. It isn’t until I tried to use it on my apple mac that I found that it didn’t scroll upwards. I tried to investigate by attempting to take it apart but stopped in the fear of breaking it. I google it (as you do) dropped on this site, read the illustrated instructions and was impressed by the detailed sequence of the whole process but still found it uncomfortable to break any seals so I read on for other alternatives and tried Raj’s method (raj Says:July 6th, 2008 at 8:12 am) et voila! Bob is your uncle! it worked! MM is back on form, scrolls up and down relentlessly. Cheers Raj, I owe you a drink. Ha Ha can’t wait to see my sons face when I’ll tell him that I fixed it.
Marcos
Thanks for your help!! Went by the numbers and everything worked great. All I needed to make it better was smaller fingers for those little wheels.
A totally excellent article. My two year old MM now works like new and looks like new.The photographs are superbly helpful, but don’t let you know how very small the magnetic rollers are. Getting the skirt off is the hardest part and working on a carpeted floor gave the best support. I removed both ribbon cables which are easy to remove by pushing up the black locking clips on each side of the connector housings. This made removing the ball housing much easier. However, getting the green ribbon connector back into position was awkward. Next time, I would try to only remove the ribbon which goes to the ball housing. A magnifying glass and a strong light are invaluable and blue tak is helpfull to hold the top shell when assembling the ribbon connectors. It does take much much more than 10 minutes, but, massive thanks for putting such an excellent article together.
For those of you even THINKING of putting liquid on the roller…
DO NOT!
Whiskey, alcohol, anything on the ball will ingress into the circuitry and permanently kill the mouse. Trust me, I’ve been down that route.
I found this site after the fact.
I can’t figure out why my side buttons don’t click anymore.
Anyway, the trackball works great.
Fantastic!
I just fix the scrolling problem of my mouse by following the instructions here. I definitely see the culprit – dirt around the roller!! Now it works like a charm! Thank you so much for posting this!
Superb info! Thanks mate! :))
Having killed my last mighty mouse by ripping it open, I was scared to try it again, but Raj’s suggestion worked for me, thank you so much! Have printed off the rest of this tutorial just in case though!
very most excellent article, thanks for taking the trouble. although, don’t start it on an empty stomach! 20 minutes later my mouse is functional again, much smoother than i remember it ever being!
but i’m so hungry i feel faint and if i had some salt the keyboard would be beyond repair by now.
Not had this much fun since being a kid and playing with Lego. Many thanks for a very concise and simple fix which even with big man-fingers was done in 15 mins tops.
Usefully, the little black wheels on mine were magnetic and so stuck to my mini-screw driver – allowing me to lift each out individually, clean them with an alcohol pen and replace quite simply.
Thinking about starting a business fixing them for people… LOL
It took me much more than ten minutes but it finally worked!
Thanks a lot for this great guide!
Instructions are good but it is not as easy as you might imagine. Apple is a bitch when it comes to those things – they dont want anyone messing with their products. Only attempt if you are really confident and/or do not care if you break it. I messed up but still managed to fix it so that now the scroll is working perfectly and so is clicking but I cant drag (highlight) and right click haha. Taking the skirt off gave me the most trouble and is perhaps the most important step. Do not skip it like I did only to have to come back to it once I’ve opened the mouse and dislocated the side buttons (hard to put back together). One tip: be very gentle with the screw as the heads can easily get damaged. Good luck