
Well… I love my Apple Mighty Mouse, and have done for 6 months.
But, all of a sudden, I lost the ability to use the scroll ball to scroll upwards.
I trawled the web to find a solution, and although there are some useful answers, none of them sorted it.
I fear it fell victim to that horrible grey muddy stuff—you know, that horrible mix of hand oils and dirt which used to be the mouser’s bane in clogging up old mechanical mice.
I tried air dusters, I tried alcohol. Nothing fixed it. So, with trepidation, I decided to go ‘inside’ and clean it properly!
Just cleaning the ball from the outside isn’t any help at all, you’ll see why when you get inside… look at the pics below! You can’t de-gunk the rollers externally.
And here, I’ve recorded my efforts so you too can clean your mouse and get it functioning like new again!
First, you’ll need:
1. A small screwdriver, crosshead
2. A flat blade, like a butter knife
3. A large work area, with a sheet of white paper to catch the bits!
4. Some alcohol and a lint-free cloth
5. Some superglue (the best quality gel stuff is advisable!)
6. 10 minutes of total dedication, no disturbances!
7. A Sharpie marker or other fine tip permanent pen
8. Cotton wool buds/Qtips
First things first, unplug your mouse and print out this page. It’s far easier to work from the page if it’s printed cos you won’t be able to scroll without a mouse 😉
I’ve broken the whole process down with illustrations…
STEP ONE
You need to open the mouse. Don’t panic, it is pretty easy. You DO have to break the glued seal, but it’s non-destructive and mine looks like it did from the factory now it’s back together.
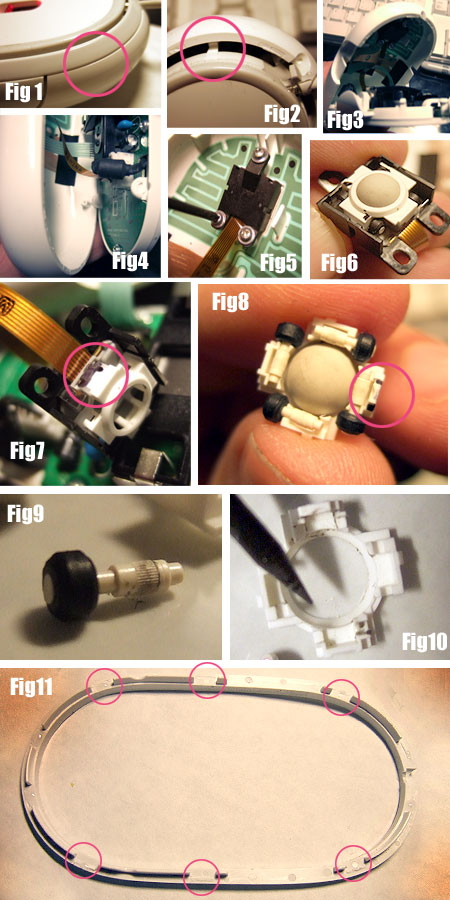
In Fig 1, I’ve circled the start point. It’s near the cable end, and you need to be prising the ‘skirt’ off. Insert the blade here and you’ll hear a crack! Work the blade gently all around. The skirt should come off now. Put it safely to one side.
STEP TWO
Near the cable end are two ‘tabs’ which hold the outer shell to the base. I found that by gently flexing the tab inwards towards the innards of the mouse, I was able to free them easily. (tab shown if Fig 2). The outer shell is now released at one end and pivots on two lugs at the opposite end (fig 3) and these lugs can be easily released by gently flexing the outer shell open at the pivot points. The two halves now come apart and are held only by two VERY delicate ribbon cables (fig 4). I didn’t find it necessary to remove the ribbon cables, as in past experience it’s tricky to put them back!
STEP THREE
Inside, you’ll see the little black housing which holds the ball, secured by three small screws. Undo them, and put them safe. (fig 5).
In Fig 6, you can see the ball housing. I marked with little black dots the orientaton of the little magnetic rollers inside. This will help when putting it back together. Also, mark the white plastic retainer AND the black housing together (fig 7) so you know which way to put them back together!
STEP FOUR
Carefully remove the white retainer by lifting the end shown in Fig 7, nearst the ribbon cable. The white retainer comes free. With it should come the ball and four little white pins with black collars—these are the magnetic rollers which feed the data to the mouse as to which direction is being scrolled. They are also the dirty bits! (fig 8).
STEP FIVE
Dismantle the little unit, remembering the orientation of the little rollers (the diagram should help!). Fig 9 shows a really dirty roller! Now clean the ball using alcohol and the lint rag.
Carefully clean the little rollers with cotton buds.
STEP SIX
Once the ball and rollers are nice and clean I blew all crud out of the inside of the mouse with an air duster (a compressed air tin) and used a small pointed tool to take all the muck out of the white retainer (fig 10).
STEP SEVEN
Re-assembly is fiddly… first put the ball back in the retainer.Hold the retainer as in Fig 8 and re-insert the rollers. You can’t put the assembly down flat from now on, as it will fall apart. See in the photo fig 8 that the black marked part of the white retainer (you did mark it with a pen, didn’t you??? ;)) is facing outward. (i’ve circled it on the picture).
Next, keeping the white retainer assembly upright, bring over the black part and offer it down over the white retainer assembly, with the black mark you made nearest the ribbon cable.
The whole thing goes together with a simple click of pressure. Turn it over and make sure it all looks OK, and that all the little black wheels are the same orientation as Fig 6.
Being careful to make sure the ribbon cable isn’t twisted, screw the ball assembly back into the upper shell.
STEP EIGHT
Keeping an eye on the ribbon cables, bring the outer and lower shell back together, starting with the pivot lugs. They snap back in really easily.
Once they are in, click the upper tabs back in, making sure the USB cable retainer is oriented back in it’s hole.
STEP NINE
Nearly there… place the mouse facing upward and get the skirt ready by placing it face down (with the little tabs facing up) in a clear area.
You now need to dab VERY SMALL dots of superglue on it. I’ve circled the dots I did in Fig 11… they are basically in the same place as the original glue.
Bring the mouse body over and lower it onto the skirt, making sure the USB cable is at the right end.
Press down a few seconds and let the glue take, then lift it all up and rubber band it tightly and leave for a while.
VOILA! It’s done!
Hope it works for you…
(*** DISCLAIMER: I did this quite competently with simple tools. If you break it, then that’s your fault, not mine!***)